In my wife’s family, they have a Christmas tradition to beat the snot out of a pinata every Christmas Eve. This tradition was started by her grandparents, and we even have a picture from as far back as 1972. Each year all of her brothers and sister take turns making the pinata, and as it worked out, this year was our turn. After putting our heads together, we decided upon a large reindeer. The trick is to make it hard enough that it will last through several attacks before breaking, light enough to hang it up, and of course, it has to look good.
The last time we made a pinata was 2005, and it turned out to be a wimpy candy cane that barely made it to the older grandkids, let alone any of the adults. The year before that in 2004, my brother-in-law used fiberglass casting material (his wife is an ER nurse), and it went through the whole family several times before breaking open, and unfortunately, by the time it opened, all the candy was pulverized. Thus, I researched ideas on the internet in order to make a pinata that would be large, lightweight, and sturdy enough for all family members to get a turn this year.
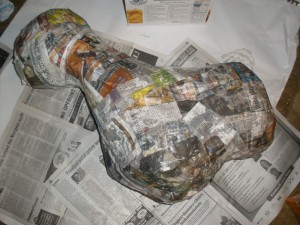
First step: Use balloons for the main shape of the body. These will be popped later to form a cavity for the candy and prizes. I used duct tape and 3 large, round balloons for the body, 2 long balloons for the neck, and 1 more round balloon for the head. I then applied 2 layers of regular paper mache (just flour and water mixed into a paste) and newspaper strips. Important note — you must allow sufficient time for the paper mache to dry before applying more layers, and don’t put on more than 2 at a time or it takes forever to dry. The next day, I applied 2 more layers of regular paper mache to the beast (4 layers total so far).
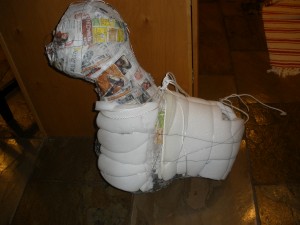 Second Step: This was something new we tried. I used a hot glue gun to apply a thin layer of condensed foam all around the body of the reindeer. We had just bought some new furniture, and the foam had been used in the packing for extra protection. The foam worked beautifully where it was applied — it helped to adhere the paper mache together and also absorbed some of the impact from the multiple blows. Important note — I failed to put any foam on the bottom of the body, and this is actually where the pinata finally ruptured. I would recommend covering the entire body with the foam. Once the foam was in place, I used 90#-pound-rated, nylon rope and wrapped it around the neck and body twice, leaving about 6 feet of slack above the top of the pinata to use for hanging. Finally, I took a roll of thin wire (0.24 guage) and built a small frame around the entire pinata, and then applied a small coat of a paper mache clay. I found the recipe from some art teachers on the internet who said it was stronger than regular paper mache and it sounded lighter as well. It consists of the following:
- 1 roll of toilet paper (unrolled, moistened, and then tore into little 1″ pieces of paper)
- 1 cup joint compound (not the lite or topping compound, just the regular stuff)
- 3/4 cup Elmer’s Glue-All
- 1/2 cup white flour
- 2 tablespoons linseed oil
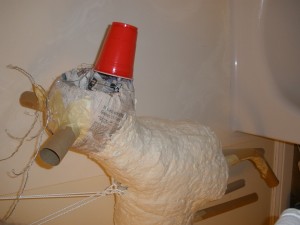 I used an electric hand mixer to combine all the ingredients, and then I used a butter knife to apply a thin coat to the pinata (total of 5 layers so far). The clay worked great and kind of looked like cookie dough, although it was a little tricky to get it to adhere to the foam. I had to trim the foam in spots, and I sprayed a little water on some of the foam, and that seemed to help it stick. This layer had to dry for 3 days.
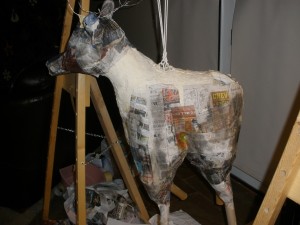 Steps 3 and 4: We cut 2 wrapping paper tubes in half and used these for the legs, and then I took 2 toilet paper rolls and used these for the ears. A large paper cup was used for the snout/nose, and I shaped some of the wire for the basic skeleton of the antlers. I also used crumpled up newspaper for the tail and to help fill in the legs, body, and neck of the deer to give it shape. Once these were in place, I applied 2 more layers of regular paper mache and newspaper strips (total of 7 layers so far).
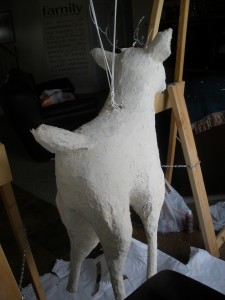 Steps 5 and 6: I applied one final coating of paper mache clay to the entire pinata (I had to mix 4 batches to cover the whole thing). I also tried to use the clay to make the antlers, but it was too wet and we decided just to use some construction paper in the end. It took another 3 days to dry, and then we painted it and put a bell around its neck. It was then ready to wallop.
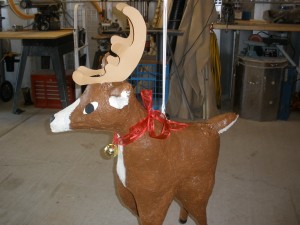 Overall, it took about 18 days to make it from start to finish.
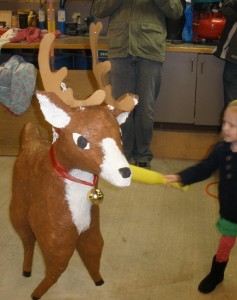
The reindeer ended up weighing 15-pounds, and then we added 5-pounds of candy, stickers, pencils, and gum. We actually made it through all 23 grandkids and 5 or 6 of the adults before the contents were all spilled out, so in my eyes, mission accomplished. Now we don’t take a turn again until about 2019 or so. I shudder to imagine how high the bar will be raised by then.
© Copyright 2011 Jeff, All rights Reserved. Written For: Jeffrey Olsen

That is just plain evil. Those poor kids. Having to wait that long for the treats. Poor, poor kids. Actually, I really got a kick out of the idea of using foam to protect it. Well done!